


Transforming your kitchen can be as simple as installing a well-designed backsplash. A kitchen backsplash not only protects the walls from stains and splashes, but it can also serve as a bold design statement that elevates the entire space. If you're planning to install a kitchen backsplash, this comprehensive guide will walk you through each step of the process, ensuring your project is a success.
Choosing the Right Backsplash
When selecting a backsplash, there are several factors to consider to ensure it complements your kitchen's aesthetics and functionality.
Material Options
The first step in your backsplash journey is selecting the right material. Here are some popular options:
- Ceramic Tile: Often the go-to for many due to its durability and affordability.
- Glass: Provides a sleek, modern look and is easy to clean.
- Natural Stone: Adds elegance but requires more maintenance.
- Stainless Steel: Perfect for a modern kitchen with industrial vibes.
- Peel and Stick: Ideal for renters or those looking for a quick upgrade without a permanent commitment.
Color and Pattern
Choosing the color and pattern is crucial for enhancing your kitchen's theme. Consider the color palette of your kitchen, the style of your cabinets, and the countertops. Bold patterns can serve as a focal point, whereas subtle, neutral tones can bring a cohesive, understated look.
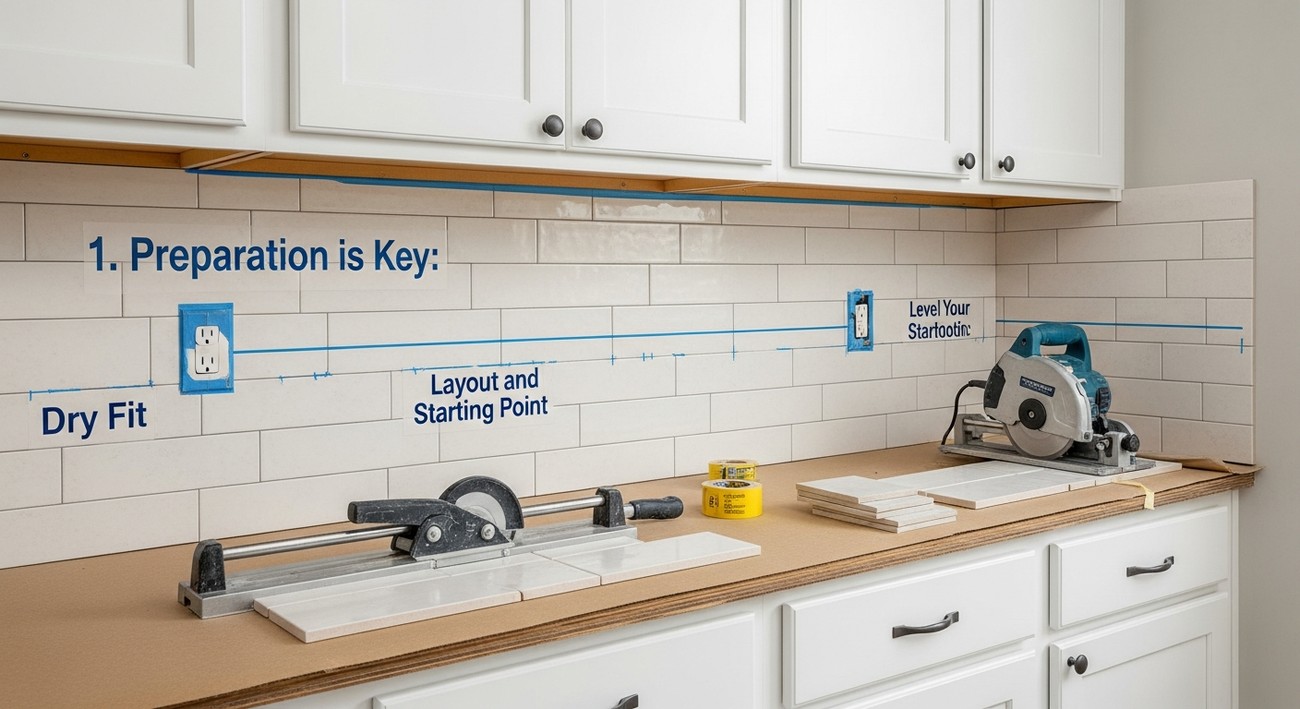
Preparing for Installation
Preparation is vital before you start installing your kitchen backsplash. This section will walk you through the essential steps to get ready for a seamless installation.
Gather Tools and Materials
Here's a list of tools and materials you'll need:
- Tiles of choice
- Tile adhesive or thin-set mortar
- Grout and matching sealer
- Tile spacers
- Notched trowel
- Tile cutter or wet saw
- Tape measure and level
- Pencil and straightedge
- Sponge and bucket
Prepare the Surface
Start by ensuring that the wall is clean, smooth, and dry. Use sandpaper to even out any imperfections. If there is any existing backsplash or wall covering, remove it to expose a bare wall.
Measuring and Planning
Proper measuring and planning can make or break your backsplash installation project. Precision here will ensure that your backsplash looks professional.
Measure the Area
Use a tape measure to determine the width and height of the area where the backsplash will be installed. Calculate the square footage by multiplying these dimensions, which will help you determine how much material you'll need.
Layout Design
Before applying any adhesive, lay out the tiles on a flat surface to pre-plan the arrangement and verify the fit. Account for cuts and the placement of accent tiles, if any.
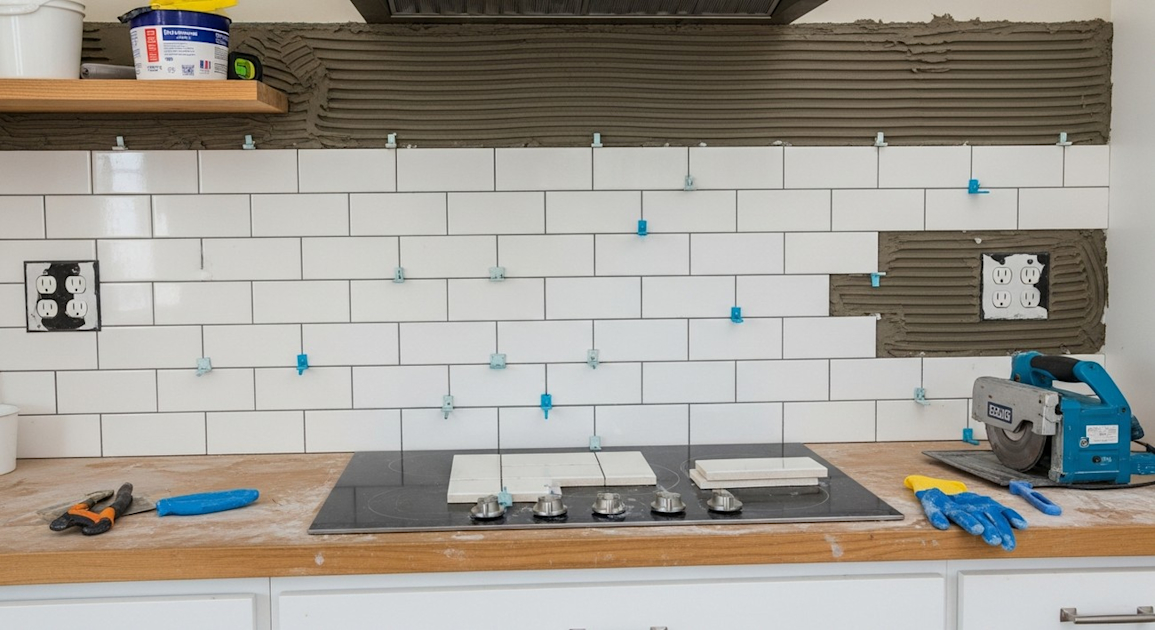
Installing the Backsplash
Now that you've prepped and planned, it's time for the exciting part—installing your kitchen backsplash.
Apply Adhesive
Using your notched trowel, apply a thin, even layer of tile adhesive or thin-set mortar onto a section of the wall. Work in small areas to ensure that the adhesive does not dry out before tile placement.
Place the Tiles
Start from the center or bottom center of your area to ensure symmetry. Place the tiles onto the adhesive, pressing firmly. Use tile spacers between each tile to ensure consistent grout lines.
Cutting Tiles
Some areas will require you to cut tiles to fit properly. Use a tile cutter or wet saw for smooth edges. Measure twice before cutting to avoid errors.
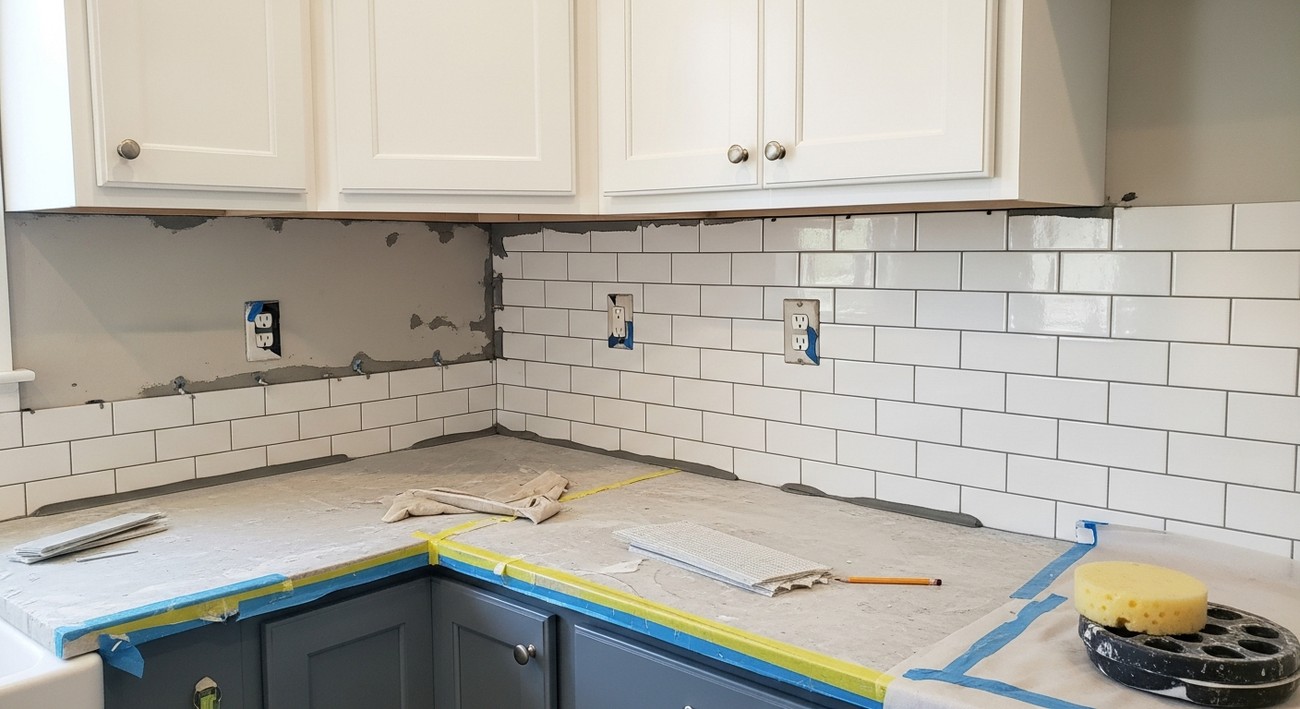
Grouting and Finishing Touches
Once your tiles are set, it's time to grout. This final touch will polish off your kitchen's new look.
Grout the Tiles
After the adhesive has dried (usually 24 hours), mix your grout following the manufacturer's instructions. Apply it using a rubber grout float, pressing it into the spaces between tiles.
Clean Excess Grout
Use a damp sponge to wipe away any excess grout from the tile surface. Rinse the sponge frequently and be cautious not to remove grout from between the tiles.
Seal and Protect
Apply a grout sealer to protect against stains and moisture. Reapply it annually to maintain its effectiveness.
Kitchen Backsplash Install Guide FAQs
How do I choose the right materials for my kitchen backsplash?
Choosing the perfect materials for your kitchen backsplash involves considering both aesthetics and functionality. You want materials that blend seamlessly with your kitchen design, whether that’s sleek and modern, rustic, or classic. Popular options include ceramic or porcelain tiles, glass, natural stone, and metal. Consider the ease of cleaning—smooth surfaces like glass tiles are easier to clean than porous stone ones. Also, think about your budget and the longevity of the material. Visiting a home improvement store for samples can help you make an informed decision.
What tools do I need for a kitchen backsplash installation?
A successful kitchen backsplash installation requires the right set of tools. Essential items include a tape measure, level, tile cutter, trowel, spacers, grout float, and a rubber mallet. You’ll also need a notched trowel to spread adhesive, a sponge for cleaning tiles as you go, and safety gear like goggles and gloves. If your backsplash involves cutting through materials like glass or stone, a wet saw might be necessary to achieve clean cuts.
Can I install a kitchen backsplash over existing tile?
Installing a kitchen backsplash over existing tile can save time and labor but requires careful preparation. You need to ensure that the existing tiles are firmly attached, clean, and even. Sand the surfaces lightly to create a good adhesive bond and fix any loose tiles. Check for any uneven spots; using a leveling compound can help smooth out the surface. Once prepared, you can apply the backsplash materials as you would on a plain wall.
What are the common mistakes to avoid when installing a kitchen backsplash?
Avoiding common mistakes can save time, resources, and frustration during your kitchen backsplash installation. Firstly, measure accurately; incorrect measurements can lead to material wastage and uneven results. Ensure that you are using the right adhesive for your specific tile type. Another common mistake is not allowing enough time for the adhesive to set before grouting, which can result in shifting tiles. Finally, improper sealing can lead to staining and moisture issues in the future, so follow the manufacturer’s recommendations carefully.
How do I determine the correct backsplash height for my kitchen?
Determining the right height for your kitchen backsplash depends largely on your personal preferences and the specific design of your kitchen. Typically, backsplashes reach up to the bottom of the upper cabinets or a minimum of 4 inches up off the counter if no cabinets are overhead. For a bold statement, some homeowners extend the backsplash all the way to the ceiling or use it to highlight a specific area like the cooking range. Consider how the height will fit in with your kitchen’s proportions and design elements.
How long does it typically take to install a kitchen backsplash?
The time it takes to install a kitchen backsplash can vary based on the complexity of the design, the materials used, and your level of experience. A basic tile installation over a small area might take a day or two, while intricate designs with more challenging materials could require more time. Allow additional time for curing and grouting as needed. Plan for the entire process, from preparation to finishing touches, to ensure a smooth installation without rushing.
How do I maintain and clean my kitchen backsplash?
Maintaining and cleaning your kitchen backsplash is crucial for its longevity and appearance. For routine cleaning, use a mild detergent mixed with water, and avoid harsh chemicals that might damage the surface. Non-abrasive sponges or cloths are best to prevent scratches. For tougher stains, a paste of baking soda and water can be effective. If your backsplash is sealed, reapply sealer as recommended by the manufacturer to keep the surface protected against moisture and stains.
Is it possible to DIY a kitchen backsplash installation, or should I hire a professional?
DIY installation of a kitchen backsplash is certainly feasible and can be a rewarding project for those with some home improvement experience. It's a manageable task if you have the right tools, materials, and patience. However, for intricate designs or complex materials like natural stone, hiring a professional might be worth considering to ensure a flawless finish. Pros can also provide professional insights into design options and optimal installation techniques for the best results.
Step-by-Step Guide
Tools/Materials Needed
- Tape measure
- Level
- Tile cutter or wet saw
- Notched trowel
- Rubber grout float
- Tile spacers
- Mixing bucket
- Sponge
- Rags
- Safety goggles
- Utility knife
- Drill
- Tile adhesive or thin-set mortar
- Grout
- Backer board (optional)
- Painter’s tape
- Tiles of your choice
- Caulking gun
- Silicone caulk
Preparation Steps
Decide on Your Design: Choose your tile style and layout. Tiles come in various materials, such as ceramic, glass, and stone. Ensure the design complements your kitchen's theme.
Calculate Materials: Measure the backsplash area to calculate how many tiles and materials you'll need.
Gather Tools and Materials: Make sure you have all the necessary tools and materials before starting. This step minimizes mid-project interruptions.
Surface Preparation: Clean the wall thoroughly to remove grease and dust. If necessary, sand any rough areas to create a smooth base. Consider installing a backer board for added support, especially if your wall isn’t perfectly flat.
Mask and Protect: Use painter's tape to protect countertops and cabinets. Cover your working area with a drop cloth to catch debris.
Detailed Instructions
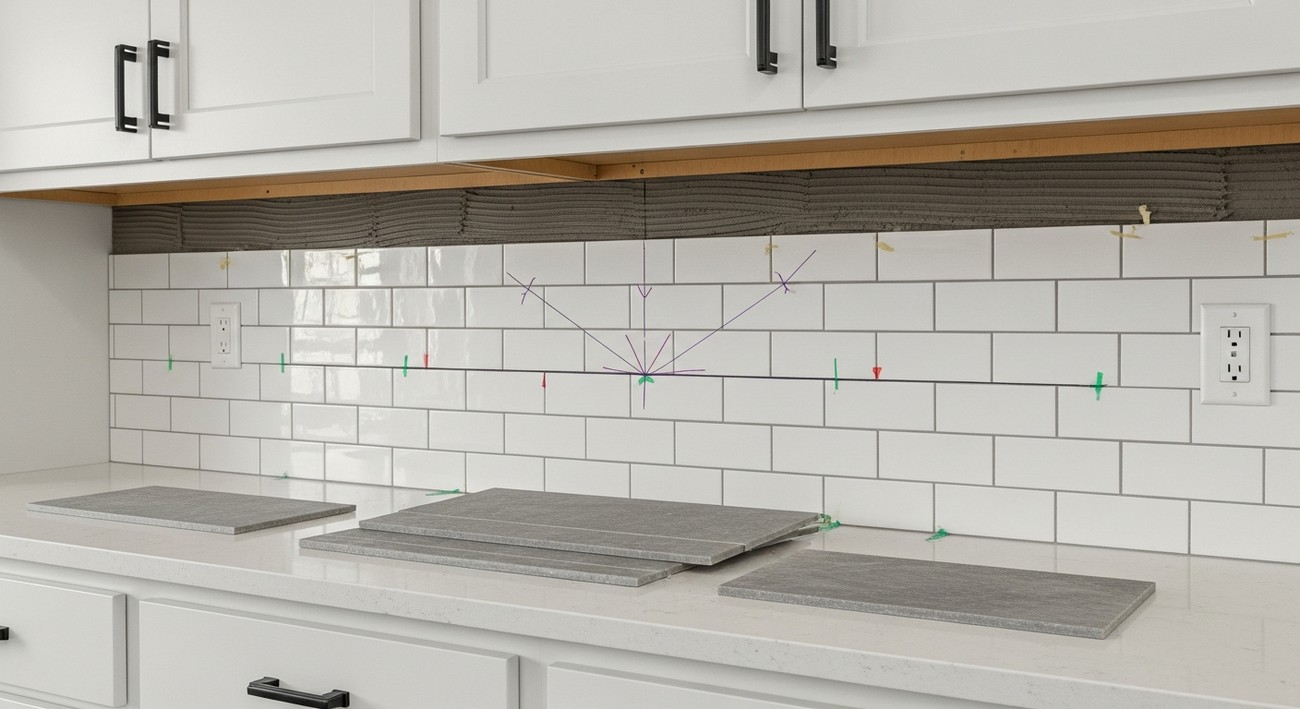
Plan Your Layout:
- Create a layout by arranging the tiles on a flat surface. Consider how you want the tiles to end at corners or around electrical outlets and other fixtures.
- Use a level to draw a straight line at the starting point as a guide, ensuring even placement.
Cutting the Tiles:
- Measure each section and mark tiles for cutting, especially those required to fit around corners or outlets.
- Use a tile cutter or wet saw for precise cuts, wearing safety goggles to protect your eyes.
Applying Adhesive:
- Mix your tile adhesive or thin-set mortar according to the manufacturer's instructions.
- Using your notched trowel, spread the adhesive on the wall, holding the trowel at a 45-degree angle.
- Only apply enough for a few tiles at a time to prevent drying out.
Tile Placement:
- Begin setting the tiles on the adhesive starting from your guideline. Insert tile spacers between each tile to maintain even gaps.
- Press each tile firmly into the adhesive and check with a level to ensure even alignment.
Addressing Outlets:
- Extra care is needed around outlets. Cut tiles to fit snugly and ensure the outlet’s covers will sit flush with the surface.
Allow Setting Time:
- Let the tile adhesive cure according to the packaging instructions, typically about 24 hours.
Grouting:
- Remove tile spacers once adhesive has cured.
- Mix grout according to instructions. Use a rubber grout float to apply it diagonally across the tiles to fill gaps.
- Wipe excess grout with a damp sponge, rinsing frequently. Let the grout set as per manufacturer guidance.
Finishing Touches:
- Once the grout has cured, use a caulking gun to apply silicone caulk along the seams where the backsplash meets countertops, cabinets, and corners.
- Buff tiles with a dry rag for a clean, polished look.
Tips for Success
- Consider Lighting: Adequate lighting during installation ensures precise tile placement. Enhance visibility by temporarily installing portable lights where needed.
- Practice First: If you're new to tiling, practice cutting tiles or spreading mortar on a scrap piece before starting the actual project.
- Keep Clean: Regularly clean tools and hands to avoid adhesive hardening in unwanted spots.
What to Do If Something Goes Wrong
- Tile Misalignment: Use gentle pressure and adjust quickly before the adhesive sets. If it’s already set, carefully remove, clean, and reapply.
- Grout Stains: Clean any grout residue off tiles promptly with warm water and a soft cloth.
- Cracked Tile: If a tile cracks during or after installation, remove it by carefully chiseling it out without damaging neighboring tiles, then replace it following the same method used for initially setting it.
Common Mistakes to Avoid
1. Skipping Surface Preparation
Skipping surface preparation is a mistake that often happens due to impatience or lack of awareness. A poorly prepared surface can lead to adhesion problems, causing tiles to loosen over time.
- Why it happens: Eager to see quick results, individuals may not realize the importance of surface preparation.
- How to avoid it: Clean the wall thoroughly, removing grease and dust. Ensure the surface is dry, and apply a layer of primer if recommended for your tile type.
- If you’ve made the mistake: If the tiles haven't set well, consider removing and resetting them. Alternatively, use a strong adhesive to reattach loose tiles.
- Expert recommendation: Always start with a clean slate. Use a high-quality degreaser and make sure the surface is even before proceeding.
2. Inaccurate Measurements
Inaccurate measurements can lead to wasted materials and a poor fit, detracting from the overall aesthetic.
- Why it happens: Measuring in haste or misunderstanding the need for precision are common issues.
- How to avoid it: Measure twice to ensure accuracy. Use a level to check line alignments and calculate tile needs, including cuts and edges.
- If you’ve made the mistake: Re-evaluate your measurements and account for any missed gaps or overlaps. Adjust tiles as necessary.
- Expert recommendation: Consider drawing a layout or using graph paper to visualize how the tiles will fit. Precision is key.
3. Misaligned Tiles
Misaligned tiles can disrupt the visual harmony of a backsplash, resulting from a lack of planning or rushing the installation.
- Why it happens: Forgetting to use spacers or not checking alignment frequently.
- How to avoid it: Use tile spacers consistently and step back occasionally during installation to ensure tiles are lining up correctly.
- If you’ve made the mistake: Carefully remove misaligned tiles while the adhesive is still wet and reposition them.
- Expert recommendation: Invest in a tile leveling system to keep your tiles straight and even, especially if you're new to tiling.
4. Choosing the Wrong Adhesive or Grout
The wrong adhesive or grout can compromise the durability and appearance of your backsplash.
- Why it happens: Product labels can be confusing, and novice installers might not know which product is best suited for their tile type.
- How to avoid it: Consult with a professional to pick the right adhesive and grout. Match the adhesive to your tile material and kitchen environment (e.g., moisture levels).
- If you’ve made the mistake: If the adhesive doesn’t bond, remove and replace it with a more suitable option. For grout, re-grouting might be necessary to ensure proper sealing.
- Expert recommendation: Always test a small area first and seek advice from specialists at a local tile store.
5. Ignoring Expansion Gaps
Neglecting expansion gaps can result in tiles cracking or warping, especially in environments where temperature fluctuates significantly.
- Why it happens: This detail can seem minor, leading many to overlook it.
- How to avoid it: Leave small gaps around the edges of your backsplash to accommodate natural expansion and contraction.
- If you’ve made the mistake: If tiles begin to crack, you may need to remove affected tiles, introduce expansion gaps, and re-tile.
- Expert recommendation: Use edge trims to hide expansion gaps and maintain a clean look.
6. Sealing Immediately After Grouting
Sealing grout too soon can trap moisture and lead to discoloration or mold growth.
- Why it happens: Misunderstanding curing times and rushing the finishing process.
- How to avoid it: Follow the manufacturer's instructions regarding grout curing time, usually a minimum of 48 hours.
- If you’ve made the mistake: Wait for the grout to dry completely, clean it thoroughly, and then proceed with sealing.
- Expert recommendation: Opt for a sealer with mildew resistance and ensure proper ventilation in the kitchen during and after installation.
Final Thoughts
A well-executed kitchen backsplash can transform the heart of your home, adding both style and functionality. This kitchen backsplash install guide has hopefully provided you with the confidence to tackle this project, whether you're going for classic tiles or a more modern look. Remember, preparation and attention to detail are key to achieving a professional finish that you'll love for years to come.
If you live in Springfield, MO, and feel a bit overwhelmed by the DIY approach, we at GoodLife Home Renovations are here to help. Our team of local experts can walk you through the entire process, ensuring your backsplash not only looks fantastic but also complements your home's unique style. Don't hesitate to reach out for a consultation or a free estimate; we’d love to be part of your renovation journey!


